![]()

Ever wonder why some online stores seem to know exactly what their customers want, while others struggle to move inventory? The difference often comes down to data—specifically, how well store owners understand their customers’ behaviors. Enhanced ecommerce analytics gives you that superpower.
Picture this: instead of guessing which products to promote or why customers abandon their carts, you’d know precisely where shoppers get stuck, which products they view but don’t buy, and exactly how they navigate through your store. That’s what enhanced ecommerce analytics delivers—crystal-clear visibility into every step of your customer’s journey.
Unlike basic store reports that simply tell you what sold, enhanced ecommerce tracking reveals the complete story behind each sale or abandoned cart. It transforms raw numbers into actionable insights that can dramatically increase your conversion rates and revenue. In this guide, you’ll learn how to implement this powerful tool, interpret the data it provides, and use those insights to make smart, profitable decisions for your Shopify store.
Why Enhanced Ecommerce Analytics Matter
Standard analytics show you sales totals and traffic sources. That’s helpful, but enhanced ecommerce analytics goes much deeper. It tracks every meaningful interaction customers have with your products—from first glance to final purchase. This granular data reveals exactly where your sales funnel leaks customers and which products deserve more attention.
Think of enhanced ecommerce as your store’s diagnostic tool. When sales aren’t meeting expectations, enhanced analytics pinpoints exactly where the problem lies. Is it your product pages failing to convince shoppers? Cart abandonment during shipping information? Or maybe customers dropping off at payment? Without this detailed tracking, you’re simply guessing—with it, you’re making informed decisions.
Enhanced ecommerce also spotlights your best-performing products, showing not just what sells well, but why. You’ll discover which items customers view most often, which they add to cart but don’t purchase, and which they buy without hesitation. These insights enable smart inventory decisions, marketing priorities, and site optimizations that directly impact your bottom line.
Overview of Enhanced Ecommerce Analytics Tools for Shopify
Shopify provides solid built-in analytics, giving you a good foundation of sales metrics, traffic data, and basic customer insights. It’s user-friendly and requires zero setup—perfect for getting started. But as your store grows, you’ll likely bump into its limitations, particularly around custom tracking and advanced segmentation.
That’s where Google Analytics 4 (GA4) enters the picture. While it requires some setup, GA4 offers significantly more depth and flexibility. You can track custom events, create advanced segments, and build detailed reports tailored to your specific business questions. The combination of Shopify’s accessible data and GA4’s powerful customization gives you the best of both worlds.
Whether you’re just launching your first store or scaling a well-established business, enhanced ecommerce analytics offers valuable insights. New store owners can identify early problems before they become habits, while experienced merchants can fine-tune their operations for maximum efficiency. The level of sophistication you implement may vary, but the fundamental principle remains: better data leads to better decisions.
Foundations: Understanding Enhanced Ecommerce Analytics on Shopify
Key Concepts and Metrics
Before diving into implementation, let’s clarify what we mean by “enhanced ecommerce.” At its core, enhanced ecommerce is a tracking framework that records detailed shopping behaviors across your store. Unlike basic analytics that primarily tracks pageviews and transactions, enhanced ecommerce captures the entire customer journey—from product impressions to purchases and even post-purchase activities like refunds.
This comprehensive tracking reveals the complete story of how customers interact with your products. You’ll see which products customers view, which ones they add to cart, where they abandon the checkout process, and ultimately, what they purchase. This visibility makes it possible to identify and fix conversion bottlenecks that standard analytics might miss entirely.
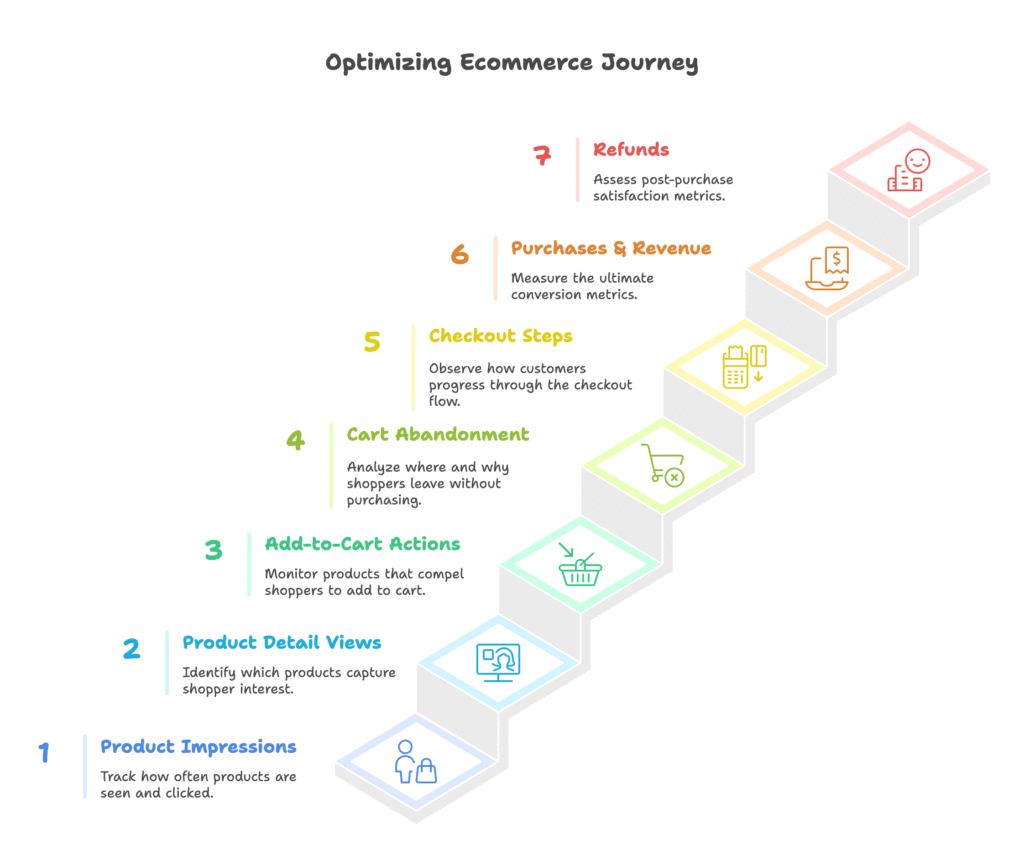
When setting up enhanced ecommerce, you’ll want to monitor several essential metrics:
- Product impressions and clicks: How often shoppers see and click on your products
- Product detail views: Which products capture shopper interest
- Add-to-cart actions: Products that compel shoppers to take the first step toward purchase
- Cart abandonment: Where and why shoppers leave without completing their purchase
- Checkout steps: How customers progress through your checkout flow
- Purchases and revenue: Your ultimate conversion metrics
- Refunds: Post-purchase satisfaction metrics
These metrics help you answer crucial questions: Which products deserve more prominent placement? Where do I lose potential customers? How can I optimize my checkout flow? The answers directly inform your merchandising, marketing, and user experience decisions.
Shopify’s Built-In Analytics vs. External Analytics Tools
Shopify includes robust analytics out of the box. The moment you launch your store, you’ll have access to sales reports, acquisition metrics, customer data, and behavior analysis. For many merchants, especially those just starting out, these built-in reports provide sufficient insight to guide initial growth.
The main advantage of Shopify’s native analytics is simplicity—they’re pre-configured, presented in an intuitive dashboard, and directly integrated with your store data. You don’t need technical expertise to access valuable insights. Plus, Shopify’s reports are specifically designed for ecommerce, focusing on metrics that matter to online retailers.
However, as your store grows and your analytics needs become more sophisticated, you may encounter limitations. Shopify’s analytics provides excellent high-level metrics but offers less flexibility for deep customization, complex segmentation, or advanced attribution models. That’s where external tools like Google Analytics 4 become valuable.
GA4 offers several advantages for serious ecommerce merchants:
- More granular event tracking and custom dimensions
- Advanced segmentation capabilities
- Cross-domain and cross-device tracking
- Sophisticated attribution models
- Integration with the broader Google marketing ecosystem
- Powerful visualization and reporting features
The tradeoff is complexity—GA4 requires more setup and maintenance than Shopify’s built-in analytics. But for merchants serious about data-driven optimization, the additional insights are well worth the effort. Most successful merchants end up using both systems: Shopify analytics for quick, accessible metrics and GA4 for deeper analysis and customization.
Step-by-Step: Setting Up Enhanced Ecommerce Analytics in Shopify
Preparing Your Store for Analytics Integration
Before diving into technical setup, take a moment to prepare properly. This upfront planning will save you headaches and ensure accurate data collection from day one. Start by confirming your store is live and accessible—while you can set up analytics on a development store, you won’t collect meaningful data until real customers visit.
Next, check your current analytics configuration. If you’re already using Universal Analytics (the previous version of Google Analytics), note that GA4 uses a different data model and event structure. You’ll likely want to run both systems in parallel while transitioning. This parallel tracking ensures you maintain historical data access while building your new GA4 dataset.
You’ll also need a Google account with administrative access to Google Analytics. If you’re using a shared account or working with a team, verify you have sufficient permissions to create properties and configure settings. Taking care of these prerequisites upfront makes the technical implementation much smoother.
Integrating Google Analytics 4 (GA4) with Shopify
Now let’s get your GA4 property set up and connected to your Shopify store. The process is straightforward:
- Visit analytics.google.com and sign in with your Google account
- Click “Admin” in the bottom left corner
- In the Account column, select your desired account (or create a new one)
- In the Property column, click “Create Property”
- Enter your property name (usually your store name), select your reporting time zone and currency, and click “Next”
- Provide your business information and click “Create”
Once your GA4 property is created, you’ll need to connect it to your Shopify store. Thankfully, Shopify has simplified this process with their Google & YouTube Sales Channel app:
- In your Shopify admin, go to “Apps” and search for “Google & YouTube Sales Channel” in the Shopify App Store
- Install the app and click “Connect account” to link your Google account
- Follow the prompts to connect your Google Analytics 4 property
- Verify the connection by checking that your Measurement ID (starting with “G-“) appears in the app settings
With this connection established, Shopify will automatically begin sending basic pageview and ecommerce events to your GA4 property. However, to unlock the full power of enhanced ecommerce, we need to enable additional settings.
Enabling Enhanced Ecommerce Reporting in GA4
GA4 works differently from previous versions of Google Analytics. Rather than explicitly enabling “enhanced ecommerce” as a feature, GA4 uses an event-based model where ecommerce events are automatically collected once you’ve established the connection with Shopify.
To ensure you’re collecting all relevant ecommerce data in GA4:
- In GA4, navigate to Admin > Data Streams > Web (your Shopify store)
- Verify that Enhanced Measurement is enabled (it should be by default)
- In your Shopify admin, go to Settings > Checkout
- Scroll down to the Google Analytics section and ensure “Use Enhanced Ecommerce” is checked
- Save your changes
With these settings configured, Shopify will automatically send key ecommerce events to GA4, including:
- view_item: When a customer views a product
- add_to_cart: When a product is added to the shopping cart
- begin_checkout: When the checkout process starts
- add_payment_info: When payment information is added
- purchase: When an order is completed
These events form the foundation of your enhanced ecommerce tracking, providing visibility into each stage of your customer’s shopping journey.
Verifying and Testing Your Setup
After implementing enhanced ecommerce, it’s crucial to verify that data is flowing correctly. The last thing you want is to make decisions based on incomplete or incorrect data. Fortunately, GA4 provides tools to validate your setup in real-time.
Start by using GA4’s DebugView for immediate verification:
- In GA4, navigate to Configure > DebugView
- In a new browser tab, visit your Shopify store
- Perform various shopping actions: view products, add items to cart, begin checkout
- Return to DebugView and confirm these events appear in the stream
For a more thorough test, create a test order in your Shopify store. Use Shopify’s test payment gateway to complete a purchase without processing an actual transaction. Then check GA4’s Real-Time reports to verify that purchase events are being recorded with the correct product and revenue information.
Pay special attention to the parameters attached to each event. For example, a purchase event should include details like transaction ID, revenue amount, tax, shipping, and product information. If any data is missing or incorrect, you may need to adjust your configuration before proceeding.
Advanced Implementation: Custom Event Tracking and Google Tag Manager (GTM)
Extending Beyond Shopify’s Default Event Tracking
While Shopify’s built-in integration covers the essential ecommerce events, you might want more detailed tracking for sophisticated analysis. By default, Shopify tracks core events like product views, add-to-cart actions, and purchases.
![]()
However, some valuable events aren’t included in this standard implementation:
- Remove from cart: When items are removed, indicating potential product issues or price concerns
- View cart: When customers view their cart but don’t proceed to checkout
- Product list views: When customers view collection pages or search results
- Promotion impressions and clicks: How shoppers interact with your promotional banners
- Refunds: Post-purchase dissatisfaction indicators
Additionally, you might want to track custom events specific to your store’s unique features or customer journey. Perhaps you offer product customization, size guides, or other interactive elements that influence purchasing decisions. Tracking these interactions can provide valuable context for understanding customer behavior.
To determine which additional events to track, analyze your customer journey and identify decision points or potential drop-off moments. Each of these represents an opportunity for customized tracking that can inform your optimization efforts.
Implementing Custom Events with Google Tag Manager (GTM)
Google Tag Manager provides a flexible way to implement custom tracking without modifying your Shopify theme code directly. It acts as a container for all your tracking tags, making it easier to manage complex analytics implementations.
To set up GTM with Shopify:
- Create a GTM account and container at tagmanager.google.com
- In Shopify admin, go to Settings > Customer Events
- Add a new Custom Pixel, enter your GTM container ID (GTM-XXXXXX), and save
- Alternatively, add GTM directly to your theme code by editing theme.liquid
Once GTM is installed, you can create tags for custom events. For example, to track “remove from cart” actions:
- In GTM, create a new trigger for the appropriate element click (e.g., cart removal buttons)
- Create a new GA4 event tag that fires on this trigger
- Configure the tag to send a “remove_from_cart” event with relevant product parameters
- Test the setup using GTM’s Preview mode
Working with Shopify’s checkout can be tricky because it’s served in an iframe. To track checkout steps thoroughly, you’ll need to use Shopify’s native checkout events in conjunction with GTM. This might involve setting up a dataLayer in your theme and configuring it to communicate across the iframe boundary using postMessage.
Best Practices for Custom Tracking
As you implement custom tracking, follow these best practices to ensure reliable, useful data:
- Document everything: Maintain a comprehensive tracking plan that lists all events, parameters, and their purposes. This documentation is invaluable for troubleshooting and onboarding team members.
- Use consistent naming conventions: Follow GA4’s recommended event names where possible (view_item, add_to_cart, etc.) and maintain consistent naming patterns for custom events.
- Include relevant parameters: Ensure each event includes useful context parameters like product IDs, names, prices, variants, and categories.
- Test thoroughly: Verify that events fire correctly under all conditions, including on different devices and browsers.
- Respect user privacy: Only collect data you genuinely need and ensure your implementation complies with privacy regulations.
Remember that more data isn’t always better—focus on tracking events that provide actionable insights rather than collecting data for its own sake. Each custom event should answer a specific business question or inform a particular optimization opportunity.
Interpreting Enhanced Ecommerce Reports for Actionable Insights
Core Reports and Their Applications
Now that you’ve set up enhanced ecommerce tracking, it’s time to extract valuable insights from the data. GA4 offers several analysis tools, but I’ll focus on three core report types that deliver immediate value for Shopify merchants.
First, let’s explore funnel analysis. In GA4, you can build custom funnels that visualize how shoppers move through your conversion path—from product views to purchases. This analysis reveals where customers drop off, helping you identify friction points in your shopping experience.
For example, if you notice a significant drop-off between “add to cart” and “begin checkout,” investigate potential issues: Is your cart button hard to find? Are shipping costs unexpectedly high? Do you require account creation? Each hypothesis suggests specific optimizations to test.
Next, examine product performance reports. These show how individual products perform at each stage of the shopping journey. Look for interesting patterns:
- Products with high views but low add-to-cart rates may have appealing images but unconvincing descriptions or high prices
- Products with high add-to-cart rates but low purchase rates might face competition from similar items or create checkout hesitation
- Products with high purchase completion rates deserve prominent placement and potential expansion into similar items
Finally, explore attribution reports to understand which marketing channels drive valuable conversions. GA4’s data-driven attribution model considers the entire customer journey, not just the last click. This provides a more nuanced view of how your marketing efforts contribute to sales.
Use these attribution insights to refine your marketing mix. If social media drives initial discovery but email campaigns close sales, both deserve credit—and continued investment. Similarly, if certain channels produce high traffic but few conversions, investigate whether you’re attracting the wrong audience or failing to meet visitor expectations.
Continuous Optimization Using Analytics
Enhanced ecommerce data is only valuable if you use it to drive ongoing improvements.
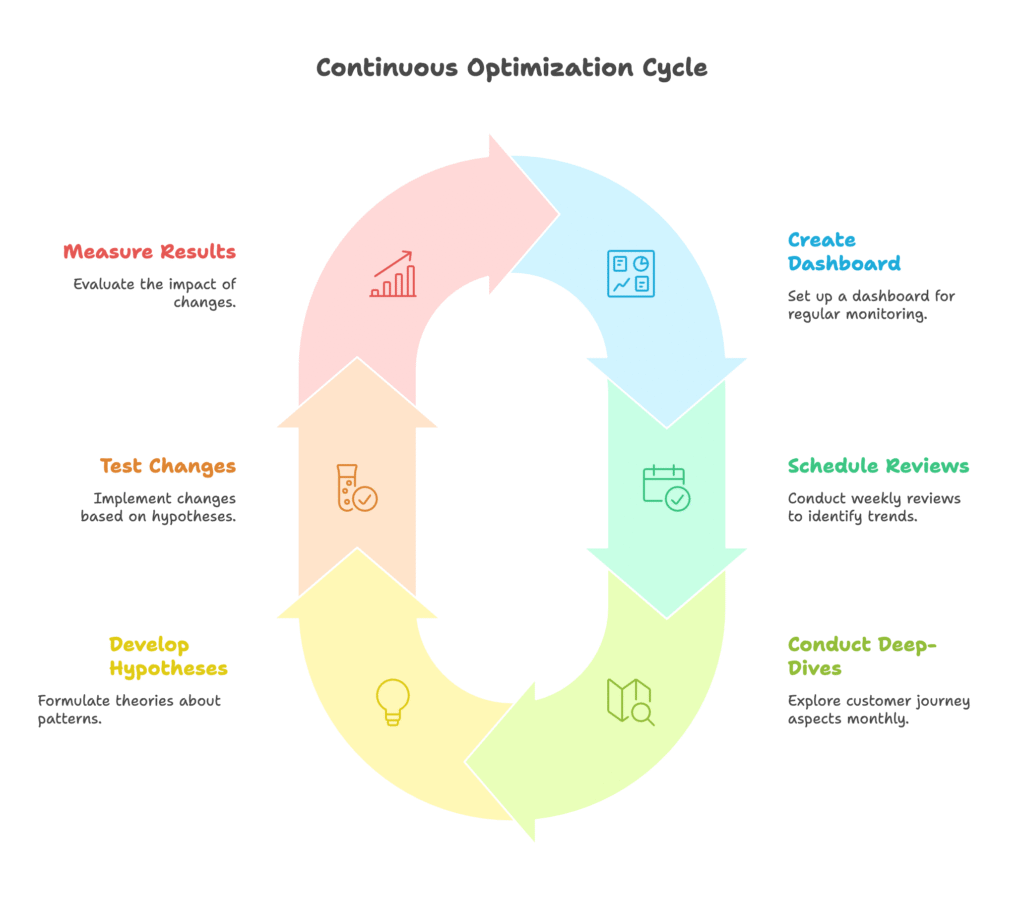
Establish a regular routine for analyzing your data and implementing changes based on your findings. Here’s an effective approach:
- Create a dashboard with your most important metrics for regular monitoring
- Schedule weekly reviews to identify trends and anomalies
- Conduct monthly deep-dives to explore specific aspects of your customer journey
- Develop hypotheses about why certain patterns occur
- Test changes based on these hypotheses
- Measure results to verify whether changes improved performance
This continuous cycle of analysis, hypothesis, testing, and measurement leads to steady improvement over time. Small, incremental enhancements compound into significant performance gains.
Consider using A/B testing alongside your analytics to validate major changes before full implementation. For example, if your data suggests that simplified product descriptions might improve conversion rates, test this change on a subset of products first. GA4 integrates with Google Optimize for streamlined experiment setup and analysis.
Also watch for unexpected changes in your metrics, which often signal problems or opportunities. A sudden drop in checkout completion might indicate a technical issue, while an unexpected surge in product views could reveal emerging customer interests worth exploring further.
Troubleshooting, Privacy, and Compliance Considerations
Common Issues and How to Resolve Them
Even with careful setup, you may encounter issues with your enhanced ecommerce implementation. Here are common problems and their solutions:
Data discrepancies between Shopify and GA4 are perhaps the most frequent concern. If your GA4 reports show different numbers than Shopify’s native analytics, don’t panic—some variation is normal. Several factors contribute to these differences:
- Different attribution models and reporting windows
- Cookie blocking and tracking prevention tools
- Time zone settings that don’t match across platforms
- Users with multiple devices or browsing sessions
If the discrepancies are large (more than 10-15%), check for duplicate tracking or missed events. Ensure you’re not running multiple analytics implementations simultaneously and verify that your tracking code appears only once on each page.
Another common issue is missing event data. If certain events don’t appear in your reports, troubleshoot methodically:
- Use GA4 DebugView to confirm whether events fire when you perform actions
- Check if recent theme updates or app installations have modified your tracking code
- Verify that tracking isn’t blocked by browser extensions during testing
- Ensure custom events are properly configured in GTM or your theme code
For technical issues that persist despite your troubleshooting efforts, consult Shopify’s help documentation or reach out to their support team. The Shopify community forums also contain valuable solutions to common analytics challenges.
Privacy, Consent, and GDPR Compliance
Analytics implementation isn’t just a technical consideration—it also involves important privacy and compliance concerns. As ecommerce becomes increasingly regulated, proper data handling practices are essential.
If you serve customers in the European Union, you must comply with the General Data Protection Regulation (GDPR). Similarly, the California Consumer Privacy Act (CCPA) affects how you handle data from California residents. These regulations require informed consent before tracking users and give visitors the right to access or delete their data.
To implement privacy-compliant analytics:
- Install a robust cookie consent solution that blocks analytics tracking until consent is granted
- Configure GA4 to respect user consent choices
- Anonymize IP addresses where required by law
- Update your privacy policy to clearly explain what data you collect and how you use it
- Implement data retention limits appropriate for your business needs
Shopify offers built-in tools to help with compliance, including customizable cookie consent banners and privacy policy templates. Additionally, GA4 includes privacy-focused features like consent mode, which adapts tracking based on user consent choices.
Remember that while analytics data is valuable, respecting user privacy builds trust with your customers. A transparent, consent-based approach not only ensures legal compliance but also demonstrates your commitment to ethical business practices.
Practical Next Steps and Ongoing Optimization
Summary of Implementation Steps
Let’s recap the key steps for implementing enhanced ecommerce analytics for your Shopify store:
- Prepare your store by auditing existing analytics and ensuring you have appropriate access
- Create a Google Analytics 4 property for your store
- Connect GA4 to Shopify using the Google & YouTube Sales Channel app
- Enable enhanced ecommerce settings in both Shopify and GA4
- Verify your implementation by testing key customer journey events
- Consider adding Google Tag Manager for custom event tracking
- Set up essential reports and dashboards for regular monitoring
- Implement a privacy-compliant consent mechanism
Following these steps will give you a solid foundation for data-driven decision-making. Your enhanced ecommerce implementation will provide visibility into customer behavior at every stage of the shopping journey, helping you identify improvement opportunities and measure the impact of your optimizations.
Recommendations for Continued Success
Enhanced ecommerce analytics isn’t a set-it-and-forget-it solution—it’s an ongoing tool that becomes more valuable with consistent use and refinement. To maximize its benefits:
- Stay updated on platform changes: Both Shopify and Google Analytics regularly introduce new features and updates. Schedule time quarterly to review documentation and ensure your implementation remains current.
- Invest in analytics training: Consider formal training for yourself or your team to build stronger data analysis skills. Google offers free GA4 courses that cover ecommerce specifics.
- Join merchant communities: Participate in Shopify and analytics forums where merchants share implementation tips and analysis strategies.
- Gradually increase sophistication: Start with basic enhanced ecommerce and add more complex tracking as your comfort level grows.
- Connect analytics to action: Establish a regular process for reviewing data and implementing improvements based on your findings.
Remember that the goal of analytics isn’t just data collection—it’s business improvement. Each insight should translate into specific actions that enhance your customer experience, optimize your marketing, or improve your products. By maintaining this action-oriented approach, you’ll ensure your analytics investment delivers tangible returns.
As your store grows, consider expanding your analytics ecosystem with complementary tools that address specific needs. Heat mapping solutions can visualize exactly how users interact with your pages, while customer feedback tools can provide qualitative context for your quantitative data. These additional layers of insight create a more complete picture of your customer experience.
References
- Shopify Help Center. “Tracking additional Google Analytics events.” https://help.shopify.com/en/manual/reports-and-analytics/google-analytics/tracking-ecommerce-events-using-analytics
- Shopify Blog. “Google Analytics 4 Ecommerce Tracking: How To Use It.” https://www.shopify.com/enterprise/blog/google-analytics-ecommerce-tracking
- Elevar. “Google Analytics for Shopify: Best Practice Implementation.” https://getelevar.com/analytics/google-analytics-for-shopify/
Ready to supercharge your Shopify store’s sales with perfectly optimized discount codes? Growth Suite is a Shopify app that helps you run effective on-site discount and email collection campaigns. With its AI-driven data engine, Growth Suite analyzes customer behavior and creates personalized offers at the perfect moment. Install it with a single click and start boosting your conversions today!