Ever looked at your Shopify store traffic with excitement, only to feel that twinge of disappointment when the sales don’t match up? You’re not alone. Most store owners face this exact challenge – plenty of visitors, but not enough buyers. That gap between visitors and customers? That’s where conversion rate optimization comes in, and it’s about to become your new best friend.
What if you could double your sales without spending an extra penny on marketing? That’s the promise of CRO – turning more of your existing traffic into paying customers. And the best part? It doesn’t require a massive overhaul of your store or a degree in web development.
What is Conversion Rate Optimization?
Conversion Rate Optimization (CRO) is the systematic process of increasing the percentage of website visitors who take a desired action – whether that’s making a purchase, signing up for a newsletter, or creating an account. For Shopify store owners, it’s primarily about transforming browsers into buyers without increasing your traffic acquisition costs.
Think of your store as a physical retail shop. CRO is equivalent to improving your store layout, training your sales staff, creating better displays, and making the checkout process smoother – all so that more of the people who walk through your door actually make a purchase.
The math is simple but powerful. If your store gets 1,000 visitors per month and converts at 1%, you make 10 sales. Bump that conversion rate to 2%, and you’ve doubled your sales to 20 – without spending an extra dollar on ads or marketing.
Currently, the average conversion rate for Shopify stores hovers around 1.8%, according to industry benchmarks. As a beginner focusing on CRO, setting a goal to reach 2-3% is both realistic and impactful. Even small improvements can lead to significant revenue gains.
Why CRO Matters for Your Shopify Business
Let’s talk money. The financial benefits of improving your conversion rate are direct and measurable. Consider this: if your average order value is $50 and you increase your conversion rate from 1.5% to 2.5%, that’s an additional $500 in revenue for every 1,000 visitors – without acquiring a single new prospect.
Statistics consistently show that businesses focusing on CRO see improved profits. A 2023 study found that e-commerce stores that invested in CRO for six months saw an average revenue increase of 25%. Even more telling, the improvements compound over time as you continue to refine your approach.
Beyond the immediate financial impact, CRO gives you a competitive edge. The e-commerce landscape is crowded, with thousands of Shopify stores fighting for attention. When a visitor lands on your site (which you’ve likely paid good money to attract), you have mere seconds to create a positive impression. A store optimized for conversions stands out from competitors through intuitive navigation, compelling product presentations, and a frictionless shopping experience.
This optimized experience doesn’t just boost immediate sales – it builds customer loyalty. Shoppers remember stores that make buying easy and pleasant. They come back more often, spend more, and tell others. While your competitors continue throwing money at acquiring new traffic, you’ll be efficiently converting the visitors you already have.
Getting Started with Shopify CRO
Before you can improve your conversion rate, you need to know where you stand and have the right tools to track your progress. Let’s build your CRO foundation.
Establishing Your CRO Foundation
The first step in any CRO journey is setting up proper analytics and tracking. You wouldn’t start a fitness program without stepping on a scale or taking measurements, right? The same principle applies to your store’s conversion health.
Start with your Shopify Analytics dashboard. Navigate to Analytics → Dashboards and ensure your store’s Overview report is set up. This gives you baseline performance data, including your current conversion rate. Next, dive deeper by exploring the “Behavior” and “Conversions” reports to understand how visitors are interacting with your store.
While Shopify’s built-in analytics provide a solid foundation, implementing Google Analytics gives you more comprehensive insights. With GA4, you can track user journeys across your store, identify where visitors drop off, and understand which traffic sources convert best. Connect Google Analytics to your Shopify store through the Online Store → Preferences section of your admin panel.
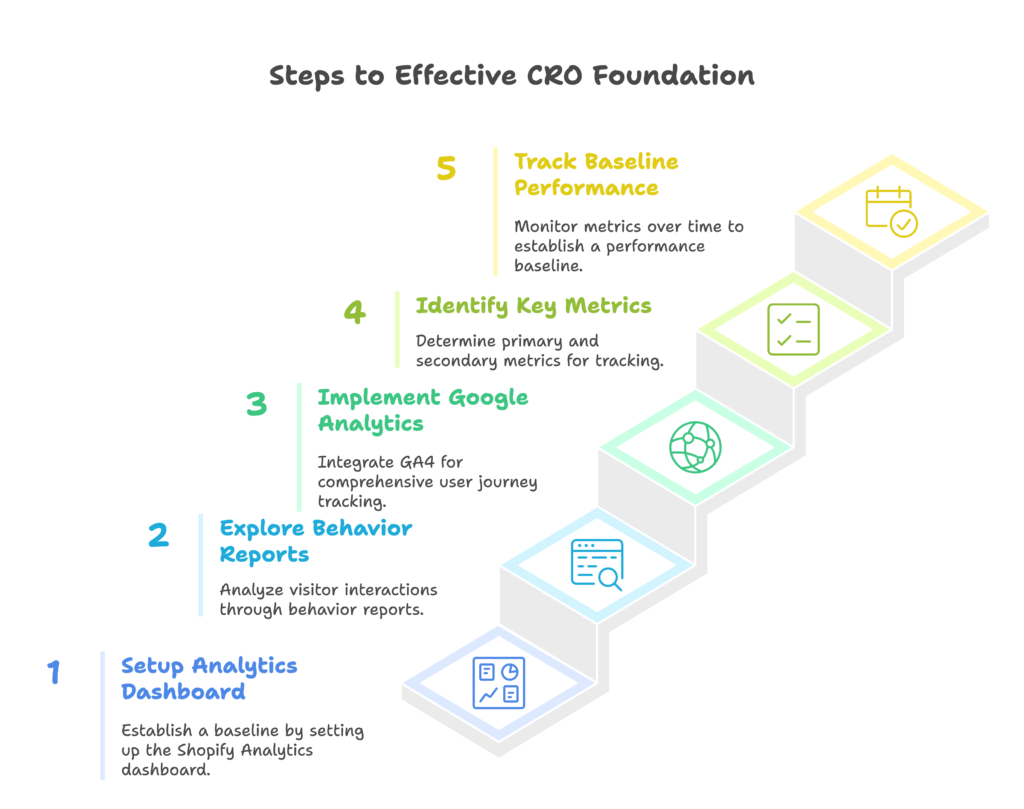
Once your analytics are in place, identify the key metrics you’ll track. Your primary metrics should include:
- Overall conversion rate: The percentage of total visitors who complete a purchase
- Cart abandonment rate: The percentage of users who add items to their cart but don’t complete checkout
- Average Order Value (AOV): The average amount spent per completed order
Secondary metrics that provide deeper insights include:
- Add-to-cart rate: The percentage of visitors who add at least one product to their cart
- Checkout completion rate: The percentage of users who begin checkout and successfully complete it
- Product page conversion rate: How effectively individual product pages convert visitors
With your metrics established, you now need a starting point – your baseline performance – before making any changes. Track these numbers for at least two weeks to account for daily and weekly fluctuations.
Essential CRO Tools for Shopify
While analytics platforms tell you what’s happening on your store, they don’t always reveal why visitors aren’t converting. To uncover these insights, you’ll need additional tools in your CRO toolkit.
Start with what’s already available to you. Beyond the Analytics dashboard, Shopify provides several built-in reports that can inform your optimization efforts:
- Acquisition reports: Understand which traffic sources bring visitors most likely to convert
- Behavior reports: See how visitors navigate through your store
- Online store conversion reports: Track conversions across different device types and landing pages
For A/B testing (comparing two versions of a page to see which performs better), you might need a third-party app like “Split Test” or “Neat A/B Testing” from the Shopify App Store. These tools allow you to create variations of your pages and measure their performance.
To truly understand visitor behavior, consider heat mapping tools like Hotjar or Lucky Orange. These visual tools show you exactly where visitors click, how far they scroll, and where they spend the most time on your pages. For instance, if your heat map shows visitors repeatedly clicking on an image that isn’t actually a link, that’s a clear opportunity for improvement.
User recording tools, also available through services like Hotjar, allow you to watch anonymous recordings of actual user sessions. This can be eye-opening – you might discover that visitors struggle to find your size chart, get confused by your checkout process, or simply can’t find the information they need before purchasing.
With your analytics and behavior tracking tools in place, you’re ready to start identifying opportunities for improvement and making data-driven changes to your store.
Optimizing Your Shopify Store Structure
Your store’s structure and navigation form the backbone of the user experience. If shoppers can’t find what they’re looking for quickly and intuitively, they’ll leave – it’s that simple. Let’s look at how to create a store structure that guides visitors toward conversion.
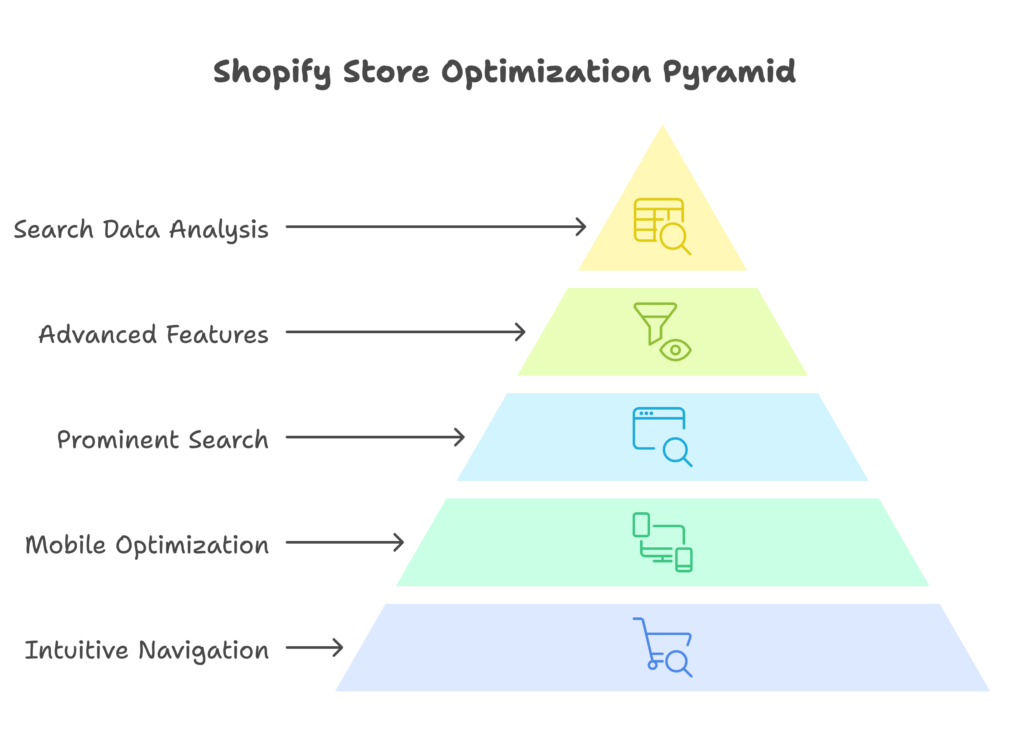
Creating an Intuitive Navigation Experience
Imagine walking into a physical store where products are haphazardly arranged, with no clear organization or signage. You’d probably walk right back out – and that’s exactly what happens with poorly structured online stores.
Research from the Baymard Institute shows that clear, well-organized navigation can increase conversion rates by up to 18.5%. That’s a massive improvement from what might seem like a minor change.
Start by designing a clear menu structure that reflects how your customers think about your products. Most Shopify stores benefit from a main navigation that includes:
- A limited number of top-level categories (5-7 maximum)
- Logically organized dropdown menus for subcategories
- Standard pages like “About,” “Contact,” and “FAQ”
To implement this in Shopify, go to Online Store → Navigation and edit your Main Menu. Create a structure that groups products logically – think about how a customer would search for items in your store. For instance, a clothing store might organize by gender first, then by product type (tops, bottoms, accessories), rather than by brand or color.
With dropdown menus, keep the options concise and descriptive. Each category name should instantly communicate what the customer will find. “Women’s Tops” is much clearer than just “Tops” or “For Her.”
Remember that over 70% of Shopify store traffic now comes from mobile devices. This makes mobile-friendly navigation non-negotiable. On smaller screens, your elaborate desktop menu transforms into a hamburger menu with limited space.
Test your mobile navigation thoroughly by browsing your store on different devices. Can you easily find products within three taps? Is the text large enough to read and the buttons big enough to tap accurately? If not, you may need to simplify your mobile menu structure or consider a theme with better mobile navigation options.
In Shopify, you can customize your mobile navigation in most themes through the Theme Editor (Online Store → Themes → Customize). Look for mobile-specific settings, which often allow you to prioritize which items appear in the mobile menu and which are relegated to a “more” section.
Enhancing Site Search Functionality
Not everyone navigates menus – many shoppers head straight for the search bar. These searchers are particularly valuable visitors; they typically have higher purchase intent and convert at rates up to 2-3 times higher than non-searchers. Yet many Shopify stores neglect this critical pathway to purchase.
Start by making your search bar prominent and easily accessible. It should be visible at the top of every page – usually in the header. To adjust this in Shopify, visit your theme customizer and look for header options.
Basic search functionality is included with every Shopify store, but it’s worth enhancing with features like:
- Predictive search: Shows suggested products, collections, and search terms as users type
- Filters and sorting options: Allows users to narrow search results by price, category, size, etc.
- Typo tolerance: Returns relevant results even when users misspell terms
Many of these advanced features require apps from the Shopify App Store. Popular options include “Search & Discovery,” “Searchanise,” and “Instant Search +.” These typically offer free plans with basic features and paid plans for more advanced functionality.
Pay special attention to your “no results” page – the page that appears when a search yields no matches. By default, this is often a dead end that leads to bounces. Instead, configure it to show:
- Popular products or featured collections
- Alternative search suggestions
- Contact information for further assistance
Finally, analyze your search data regularly. In Shopify Analytics, the “Behavior” section includes a “Searches” report showing what customers are looking for. Look for:
- Frequently searched terms that yield no results (potential new product opportunities)
- Searches that lead to immediate purchases (potential featured products)
- Alternative terms used for your products (potential keyword opportunities)
By optimizing both navigation and search, you’re removing major barriers that prevent visitors from finding – and buying – your products.
Product Page Optimization Techniques
Your product pages are where the magic happens – or doesn’t. They’re the digital equivalent of a sales associate making the final pitch before a customer decides to buy. Let’s make that pitch irresistible.
Creating High-Converting Product Descriptions
The psychology behind customer decision-making is complex, but one principle stands above all: people buy benefits, not features. Your customers don’t care that your water bottle is made of double-walled stainless steel; they care that it keeps their drinks cold for 24 hours and doesn’t sweat in their gym bag.
Start by transforming your product features into customer-centered benefits. For every feature, ask yourself: “So what? How does this improve my customer’s life?” Then lead with that benefit in your description.
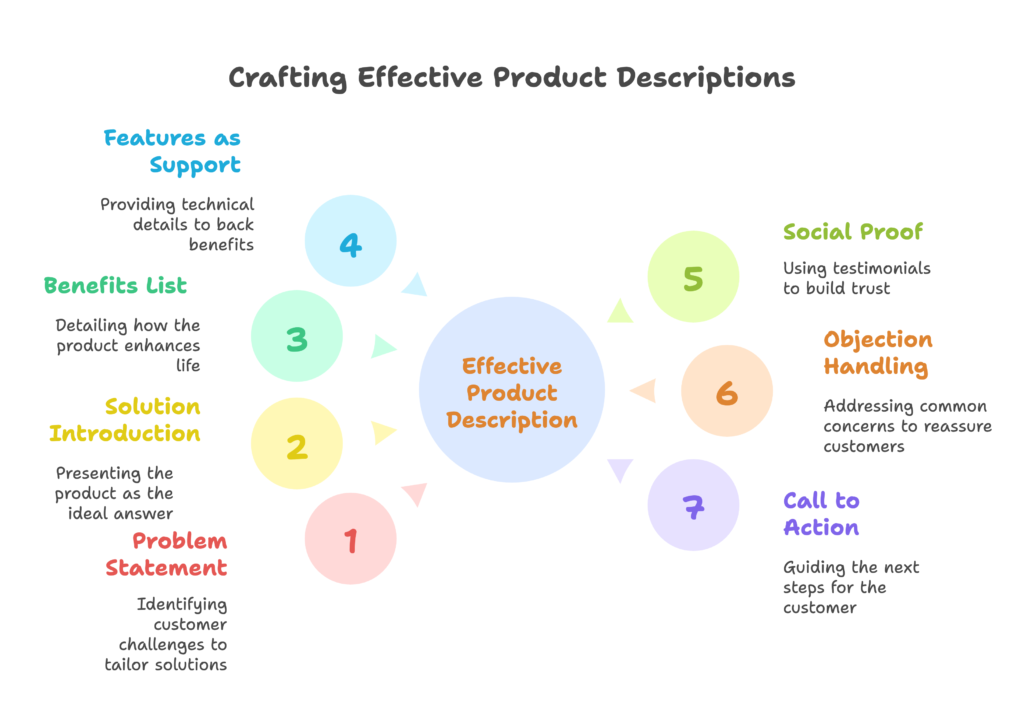
A simple template for benefit-focused product descriptions follows this structure:
- Problem statement: Identify the challenge your customer faces
- Solution introduction: Present your product as the answer
- Benefits list: Explain how the product improves their life
- Features as support: Back up benefits with technical details
- Social proof: Include a testimonial or review snippet
- Objection handling: Address common concerns
- Call to action: Tell them exactly what to do next
Here’s a practical example for a yoga mat:
Tired of slipping during downward dog or feeling every hard edge of the floor through your mat? The UltraGrip Pro Yoga Mat provides the perfect balance of cushioning and stability, so you can focus on your practice instead of your discomfort. The non-slip surface gives you confidence during challenging poses, while the extra 5mm thickness protects your joints without sacrificing balance. Made from eco-friendly natural rubber with a closed-cell surface that prevents sweat absorption and bacteria growth – meaning no more mat odors. “I’ve tried dozens of mats over my 10 years of teaching, and this is the only one I recommend to all my students,” says Emma L., certified yoga instructor. Worried about durability? Each mat comes with a 5-year warranty. Add to cart now to transform your yoga practice tomorrow.
Notice how this description addresses the customer’s problems, emphasizes benefits first, backs them up with features, includes social proof, handles objections, and ends with a clear call to action.
Beyond the written description, your product images and visuals play an even more crucial role. Research shows that 83% of shoppers consider product images to be the most influential factor in their purchase decisions.
For Shopify stores, aim for:
- Multiple high-quality images (5-8 per product) showing different angles and details
- At least one lifestyle image showing the product in use
- Zoom functionality that allows customers to examine details
- Product videos demonstrating key features and benefits (these can increase conversions by up to 80%)
Optimizing images for Shopify’s CDN (Content Delivery Network) ensures they load quickly while maintaining quality. For optimal performance:
- Use .jpg format for photographs and .png for images requiring transparency
- Keep file sizes under 200KB when possible
- Use descriptive filenames that include your product name (e.g., “black-leather-weekender-bag-side.jpg”)
- Add alt text that describes the image for accessibility and SEO
Together, compelling benefit-focused descriptions and high-quality visuals transform your product pages from mere catalogs into persuasive sales tools.
Building Trust Elements
No matter how perfect your product seems, customers still need reassurance before they’ll hand over their credit card information. Trust elements bridge this confidence gap.
Social proof – evidence that others have purchased and enjoyed your products – is perhaps the most powerful trust builder. According to a recent consumer survey, 93% of shoppers say online reviews impact their purchasing decisions, and products with 5+ reviews are 270% more likely to be purchased than those with none.
Implement social proof on your Shopify store by:
- Installing a review app like “Product Reviews” (Shopify’s free option), “Judge.me,” or “Loox”
- Actively requesting reviews through post-purchase email sequences
- Displaying review counts and star ratings prominently on product listings and pages
- Featuring user-generated content (UGC) like customer photos showing your products in real life
Beyond reviews, additional trust signals reassure visitors that your store is legitimate and secure. Research from the Baymard Institute shows that 17% of online shoppers have abandoned a purchase because they didn’t trust the site with their credit card information.
Enhance trust in your Shopify store by adding:
- Security badges (like SSL certificates, McAfee, Norton) in your footer and checkout pages
- Payment method logos showing trusted payment options like credit cards, PayPal, and Shop Pay
- Satisfaction guarantees that reduce perceived purchase risk
- Clear return and refund policies that demonstrate confidence in your products
- Contact information including a phone number and physical address (if applicable)
Many of these trust elements can be added through your Shopify theme’s settings or with apps like “Trust Badge” or “Trust Hero.” Place them strategically – security badges work best near checkout buttons, while guarantees should appear close to product information.
By combining persuasive product presentations with strong trust elements, you’re addressing both the emotional and rational sides of customer decision-making – and paving the way for more conversions.
Checkout Optimization for Maximum Conversions
You’ve done the hard work of getting visitors to your store and convincing them your products are worth buying. Now comes the critical moment – checkout. This is where the rubber meets the road… and where many merchants lose sales unnecessarily.
Streamlining the Checkout Process
Cart abandonment is the silent killer of e-commerce profitability. The average abandonment rate across all industries hovers around 70%, meaning 7 out of 10 shoppers who begin the checkout process never complete it. The good news? Many abandonment causes are easily fixable.
Research from the Baymard Institute identifies the top reasons shoppers abandon checkout:
- Extra costs (shipping, taxes, fees) too high (48%)
- Being forced to create an account (24%)
- Complicated or lengthy checkout process (17%)
- Unable to calculate total order cost upfront (16%)
- Website errors or crashes (13%)
To reduce checkout friction in your Shopify store, start by configuring your checkout settings. Go to Settings → Checkout and customize options to create a smoother experience:
- Enable guest checkout to allow purchases without account creation
- Reduce form fields to the absolute minimum required
- Pre-select the most common options (like shipping method) when appropriate
- Enable auto-complete for address fields
- Set your form to remember customer information for returning visitors
Beyond these basic settings, consider implementing accelerated checkout options. Shopify’s data shows that Shop Pay – their expedited checkout option – converts 50% higher than regular checkout because it saves customer information securely and enables one-click purchasing.
To set up Shop Pay, ensure it’s enabled in your payment settings (Settings → Payments → Shop Pay). Once active, promote this option to your customers by:
- Adding the Shop Pay badge to your product pages
- Mentioning the faster checkout in your product descriptions
- Including information about Shop Pay in your FAQ page
Other accelerated checkout options to consider include Apple Pay, Google Pay, and PayPal. The more payment options you offer – especially these low-friction ones – the higher your conversion rate will typically be.
Addressing Cart Abandonment
Even with an optimized checkout, some customers will inevitably abandon their carts. Instead of accepting this as lost revenue, implement recovery strategies to bring these potential customers back.
Cart recovery emails are remarkably effective, with an average recovery rate of 10-15% according to multiple studies. Some high-performing stores see recovery rates above 20% with well-crafted email sequences.
Shopify includes abandoned cart email functionality in all plans. To set this up:
- Go to Settings → Checkout → Abandoned checkouts
- Enable automatic emails
- Customize the email content and timing
For best results, consider a sequence of 2-3 emails:
- First email (1-3 hours after abandonment): Helpful reminder with product images and a direct link back to their cart
- Second email (24 hours later): Address common objections and perhaps include social proof
- Third email (3-5 days later): Create urgency or offer an incentive (like free shipping or a small discount)
Beyond email, exit-intent optimization can capture shoppers before they leave your site. Exit-intent technology detects when a visitor is about to leave your page (typically by moving their cursor toward the browser’s close button or address bar) and displays a targeted message or offer.
Research suggests that exit-intent popups can recover 10-15% of otherwise lost visitors. For Shopify stores, apps like “Privy,” “Justuno,” or “Getsitecontrol” offer exit-intent functionality.
Effective exit-intent strategies include:
- Cart-specific offers: “Complete your purchase now and get free shipping” (only for visitors with items in cart)
- Email capture with discount: “Don’t leave empty-handed – get 10% off when you sign up for our newsletter”
- Objection handling: “Not sure about sizing? Chat with our fit experts now”
- Limited-time cart saving: “We’ll save your cart for 24 hours so you can come back and complete your purchase”
By optimizing both your checkout process and recovery strategies, you’re plugging the leaks in your conversion funnel where many merchants lose the most potential revenue.
Testing and Optimization Strategies
Now that you’ve implemented improvements across your store, it’s time to systematically test and refine them. CRO isn’t a one-time fix – it’s an ongoing process of hypothesis, testing, and improvement.
Implementing A/B Testing
A/B testing (sometimes called split testing) involves creating two versions of a page or element and dividing your traffic between them to see which performs better. It removes guesswork from your optimization efforts by providing clear data on what works and what doesn’t.
Not all elements are equally worth testing. To identify the most impactful test opportunities, use the PIE framework to prioritize based on:
- Potential: How much improvement can you realistically expect?
- Importance: How valuable is the page or element to your conversion process?
- Ease: How difficult will the test be to implement?
For most Shopify stores, high-PIE test opportunities include:
- Product page layout and call-to-action buttons
- Homepage hero sections and featured products
- Product image style and quantity
- Pricing presentation and shipping options
- Trust badges and their placement
To implement A/B tests on your Shopify store, you’ll need a third-party app since Shopify doesn’t offer native split testing. Popular options include “Split Test” by Convertize, “Neat A/B Testing,” or more comprehensive tools like Optimizely or VWO.
When setting up your tests, remember these principles:
- Test one element at a time for clear cause-and-effect relationships
- Run tests long enough to achieve statistical significance (typically 1-4 weeks depending on your traffic volume)
- Split traffic equally between versions
- Define clear success metrics before launching the test
Analyzing test results requires a balance of statistical rigor and practical judgment. A result is generally considered statistically significant when there’s a 95% or greater probability that the difference between versions isn’t due to random chance.
When you identify a winning variation, implement it permanently in your Shopify theme. For Shopify Plus stores, this often means updating your theme code directly. For standard Shopify stores, you might need to make changes through the theme editor or work with a developer to implement more complex modifications.
Continuous Improvement Framework
Rather than approaching CRO as a series of random tests, successful merchants develop a systematic framework for continuous improvement.
Start by creating a CRO roadmap – a prioritized plan for testing and optimization. Your roadmap should follow this methodology:
- Analysis: Review your analytics data to identify conversion bottlenecks
- Hypothesis: Form theories about why these issues occur and how to fix them
- Prioritization: Rank potential tests using the PIE framework
- Testing: Implement A/B tests for the highest-ranked opportunities
- Implementation: Apply winning variations permanently
- Learning: Document insights gained, even from unsuccessful tests
- Iteration: Use learnings to inform the next round of hypotheses
With this framework in mind, build a testing calendar specific to your Shopify store. For most merchants, this means scheduling 1-2 major tests per month, with tests running for 2-3 weeks each to gather sufficient data.
Beyond the immediate conversion rate, measure long-term CRO success through additional key performance indicators:
- Revenue per visitor (RPV): Often a more holistic measure than conversion rate alone
- Average order value (AOV): Are your optimizations increasing purchase size?
- Customer lifetime value (CLV): Are you acquiring higher-quality customers?
- Return on investment (ROI): Are your CRO efforts delivering positive returns?
Shopify’s native reports can track many of these metrics. Navigate to Analytics → Reports to access dashboards for sales, acquisitions, inventory, and customer behavior. For more advanced analysis, complement Shopify’s tools with Google Analytics and your specific testing platform’s reporting features.
By implementing a structured, data-driven approach to testing and optimization, you transform CRO from a guessing game into a reliable system for continuous improvement and growth.
Advanced CRO Techniques for Growing Shopify Stores
Once you’ve mastered the fundamentals, it’s time to explore advanced CRO strategies that can take your conversion rates to the next level. These techniques require a deeper understanding of your customers and more sophisticated implementation, but they can deliver outsized returns.
Personalization Strategies
The days of one-size-fits-all online shopping experiences are behind us. Modern consumers expect personalization – and they reward it handsomely. Research from McKinsey shows that personalization can reduce acquisition costs by up to 50%, lift revenues by 5-15%, and increase marketing spend efficiency by 10-30%.
Customer segmentation is the foundation of effective personalization. This involves dividing your visitors into groups based on shared characteristics, then tailoring their experience accordingly.
Valuable segmentation approaches for Shopify stores include:
- New vs. returning visitors: First-time visitors might need more educational content and trust signals, while returning visitors respond better to new product highlights and personalized recommendations.
- Purchase history: Showing related products based on past purchases increases repeat business.
- Traffic source: Visitors from Pinterest might respond better to visually rich layouts, while Google search visitors might prefer information-dense pages.
- Geographic location: Customize currency, featured products, and shipping information based on the visitor’s country or region.
Implementing personalized recommendations in your Shopify store typically requires an app like “Personalized Recommendations,” “Also Bought,” or “LimeSpot Personalizer.” These apps analyze browsing and purchase patterns to suggest products that each individual visitor is likely to be interested in.
Beyond product recommendations, behavioral targeting allows you to tailor content based on how visitors interact with your store. Using apps like “Intelligems,” “Klaviyo,” or “Privy,” you can create experiences triggered by specific behaviors:
- Show category-specific popups based on browsing history
- Display different homepage banners for different visitor segments
- Adapt product descriptions to highlight features relevant to each visitor’s interests
- Change call-to-action messaging based on visitor engagement level
To implement personalized content blocks in Shopify, you have several options:
- Theme sections: Many modern Shopify themes support conditional content blocks that can be shown or hidden based on visitor criteria.
- App blocks: Apps like “Personalization Suite” allow you to insert dynamic content without coding.
- Scripts: Shopify Plus merchants can use Script Editor to create highly customized experiences based on customer data.
Remember that personalization must balance sophistication with privacy concerns. Always be transparent about data collection and provide clear opt-out mechanisms to maintain customer trust.
Conversion-Focused Marketing Integration
Your CRO efforts shouldn’t exist in isolation from your broader marketing strategy. Integrating conversion optimization with your marketing channels creates a cohesive customer journey that drives more sales.
Email marketing remains one of the most powerful conversion tools, with an average ROI of $36 for every $1 spent according to recent studies. Yet many Shopify merchants fail to fully leverage email for conversion optimization.
Optimize your email marketing integration by:
- Implementing strategic email capture: Use timed popups, exit-intent offers, and embedded signup forms to grow your list with high-intent subscribers.
- Creating segment-specific landing pages: Direct email subscribers to custom pages designed specifically for their needs and interests.
- Developing automated email sequences: Build welcome series, browse abandonment emails, and post-purchase flows that guide subscribers toward their next conversion.
- Testing email-to-landing page continuity: Ensure consistent messaging, imagery, and offers between emails and the pages they link to.
Shopify integrates with numerous email marketing platforms, with Klaviyo, Omnisend, and MailChimp being popular choices. These platforms offer pre-built automation templates specifically designed for e-commerce conversion optimization.
Beyond email, social proof amplification helps convert skeptical browsers into buyers. While basic review collection is essential, advanced merchants take social validation to the next level.
Recent research shows that user-generated content (UGC) increases conversion rates by 29% on average, with younger demographics particularly influenced by authentic customer content.
Implement advanced social proof strategies in your Shopify store with:
- Live sales notifications: Apps like “Sales Pop” or “FOMO” display recent purchases to create urgency and validation.
- Instagram feeds: Showcase real customers using your products through apps like “Instafeed” or “Foursixty.”
- Video testimonials: Feature customer success stories and product demonstrations using apps like “Loox” or “Videowise.”
- Trust widgets: Display real-time visitor counts, stock levels, and aggregate review scores to create confidence.
For maximum impact, strategically place these social proof elements at key decision points in the customer journey – especially on product pages and during checkout.
By integrating advanced personalization and marketing strategies with your foundational CRO efforts, you create a sophisticated conversion ecosystem that consistently turns more browsers into buyers.
Conclusion: Your CRO Action Plan
You’ve now learned the principles, strategies, and techniques that drive successful conversion rate optimization for Shopify stores. The difference between stores that struggle and those that thrive often comes down to implementation – turning knowledge into action. Let’s create your CRO action plan.
Prioritizing Your First Optimization Steps
CRO can feel overwhelming when you’re starting out. Rather than trying to implement everything at once, focus on these high-impact, low-effort optimizations that typically deliver the quickest results:
- Install analytics and heatmapping tools to establish your baseline and understand current behavior
- Optimize your top 3 product pages with better images, benefit-focused descriptions, and prominent reviews
- Implement abandoned cart recovery emails to recapture nearly-completed sales
- Add trust signals like security badges and guarantees to your product and checkout pages
- Ensure your site is fully mobile-optimized by testing the complete purchase process on multiple devices
For most Shopify stores, this focused approach can yield significant improvements within 30 days. Once these fundamentals are in place, expand your efforts according to this implementation timeline:
- Months 1-2: Focus on product page optimization and cart recovery
- Months 3-4: Implement A/B testing and navigation improvements
- Months 5-6: Develop personalization and advanced marketing integration
This gradual approach allows you to learn from each phase before moving to more complex strategies. It also prevents overwhelming your team or budget with too many simultaneous changes.
Building a Sustainable CRO Culture
The most successful Shopify merchants don’t see CRO as a project – they view it as an ongoing business discipline. Building a sustainable CRO culture means embracing continuous testing and improvement as core values.
Create processes that support this mindset:
- Schedule regular CRO reviews (monthly or quarterly) to assess performance and plan new tests
- Document all tests and results in a centralized location, including both successes and failures
- Involve team members from different departments (marketing, product, customer service) in CRO discussions
- Set aside a dedicated budget for testing tools and resources
- Celebrate wins when optimization efforts deliver results
Remember that CRO is as much about mindset as it is about tactics. Cultivate curiosity about why visitors behave as they do, humility to learn from test results that contradict your assumptions, and patience to let data guide your decisions rather than gut instinct alone.
As your store grows, your CRO approach will evolve. What works for a store with 100 daily visitors may not be optimal for one with 10,000. Regularly reassess your strategies and be willing to adapt as your business scales.
The journey to optimal conversion rates is never truly complete – there’s always another test to run, another insight to uncover, another percentage point to gain. By implementing the strategies in this guide and committing to continuous improvement, you’re positioning your Shopify store for sustainable growth and competitive advantage in the increasingly crowded e-commerce landscape.
Start small, test diligently, and scale what works. Your future customers – and your bottom line – will thank you.
References
- Shopify. (2024). “How to Increase Conversion Rate: 20 Advanced Strategies.” Shopify Enterprise Blog. https://www.shopify.com/enterprise/blog/ecommerce-conversion-rate-optimization
- ConvertCart. (2025). “How Do I Boost My Shopify Conversion Rate? (50 Effortless Strategies).” ConvertCart Blog. https://www.convertcart.com/blog/shopify-conversion-rate
- Instant. (2025). “22 Practical tips for Shopify conversion rate optimization.” Instant Blog. https://instant.so/blog/shopify-conversion-rate-optimization
- Shopify. (2024). “What Is Conversion Rate Optimization (CRO)? Strategies for Success.” Shopify Blog. https://www.shopify.com/blog/120261189-conversion-rate-optimization
- First Pier. (2023). “Maximize Shopify Success: Ultimate CRO Checklist Guide.” First Pier Resources. https://www.firstpier.com/resources/cro-checklist-for-shopify
- CRO Media. (2024). “Optimizing Shopify Stores with CRO: Conversion Boosting Strategies.” CRO Media Insights. https://cro.media/insights/seo/optimizing-shopify-stores-cro/
Ready to supercharge your Shopify store’s sales with perfectly optimized discount campaigns and email collection? Growth Suite is a free Shopify app that helps you analyze customer behavior, run personalized offers, and increase your conversion rates. With Growth Suite’s AI-driven discount engine, you can create campaigns that look and feel like native features on your store, automatically applying personalized discount codes and creating urgency through customizable timers. Install it with a single click and start turning more browsers into buyers today!
Looking for more ideas for Shopify conversion optimization? Checkout CRO Fundamentals for Shopify guide and Conversion Rate Optimization for Shopify Stores guide.




[…] looking for more ideas to start conversion rate optimization for your Shopify store, check out The Beginner’s Guide to Conversion Rate Optimization for Your Shopify Store […]
[…] The Beginner’s Guide to Conversion Rate Optimization for Your Shopify Store […]